
Lawn mower blade sharpener choices matter more than most people expect, because the wrong tool (or the right tool used the wrong way) can leave you with a rough cut, extra vibration, and a blade that dulls again fast.
If your lawn looks “torn” instead of cleanly clipped, or your mower suddenly sounds harsher than usual, sharpening is often the simplest fix you can control at home. You don’t need a shop visit every time, but you do need a process you can repeat without guessing.
This guide breaks down the main sharpener tool options, how to pick one that matches your mower and comfort level, and a practical step-by-step workflow. I’ll also flag the mistakes that waste time, like over-grinding or “sharpening” a bent blade that should be replaced.
Why mower blades go dull (and why your lawn shows it)
A mower blade doesn’t need to be razor-sharp, it needs a consistent edge with the correct bevel. Most dullness comes from normal abrasion, but a few real-world habits speed it up.
- Sand and dust: Dry areas or mowing near driveways acts like sandpaper on the edge.
- Hidden impacts: A small rock strike can nick the edge, then each pass makes the nick worse.
- Mowing too low: Scalping pulls debris into the deck and hits soil more often.
- Wet mowing: Clumps can create uneven load and encourage corrosion over time.
According to Oregon State University Extension Service..., clean cuts reduce stress on grass and can support healthier turf, while ragged cuts tend to brown at the tips. In practice, you’ll notice it as a “frayed” look a day or two after mowing.
How to tell you need sharpening (quick checklist)
Before buying a new tool or pulling the blade, you can usually diagnose this in five minutes. If you check three or more boxes, sharpening is typically worth doing soon.
- Grass tips look shredded or tan/brown within 24–48 hours.
- Mower starts vibrating more than usual (not always sharpening-related, but a clue).
- You see nicks or shiny flat spots along the cutting edge.
- You need to mow slower to avoid missed strands.
- Blade edge feels rounded (carefully, with gloves) rather than crisp.
If you see cracks, severe pitting, or a bend, pause the DIY sharpening plan. That’s often a replacement decision, not a sharpening decision.
Choosing a lawn mower blade sharpener tool (what actually changes your results)
Most homeowners end up picking between a file, a drill-powered sharpener, a bench grinder, or an angle grinder. The best option is usually the one you can control steadily and repeatably, not the one that removes metal fastest.
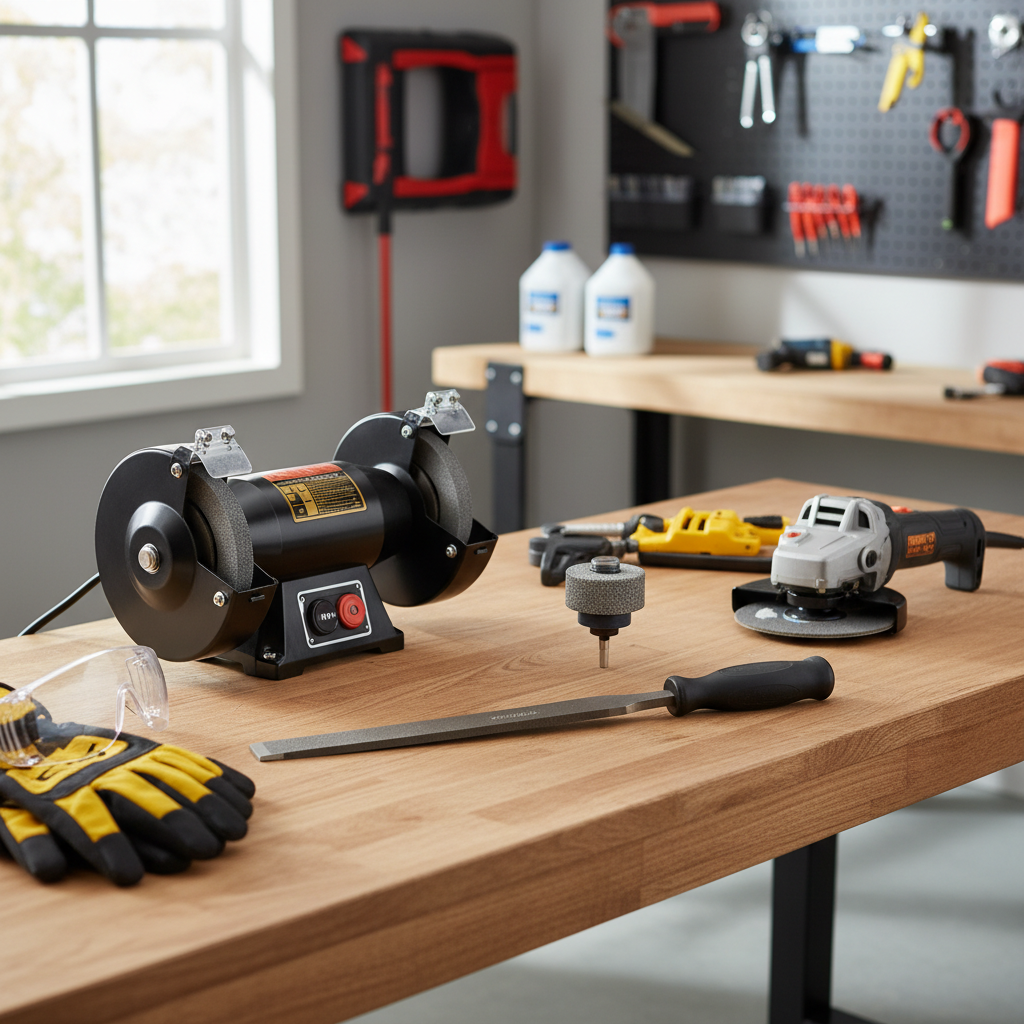
Tool comparison table
| Tool type | Best for | Pros | Watch-outs |
|---|---|---|---|
| Hand file | Occasional sharpening, maximum control | Low cost, hard to overheat steel | Slower, takes steady technique |
| Drill sharpener attachment | Homeowners who want faster results without freehand grinding | Easy learning curve, portable | Can follow existing bad angle if blade already uneven |
| Bench grinder | Frequent sharpening, shop setup | Fast, consistent once dialed in | Heat buildup, easy to remove too much metal |
| Angle grinder (flap disc) | Heavier damage, faster metal removal | Quick repairs, versatile | Higher skill, higher risk of uneven edge |
For many garages, a drill attachment plus a simple blade balancer hits a practical sweet spot. A file is still a great choice if you value control and don’t mind the time.
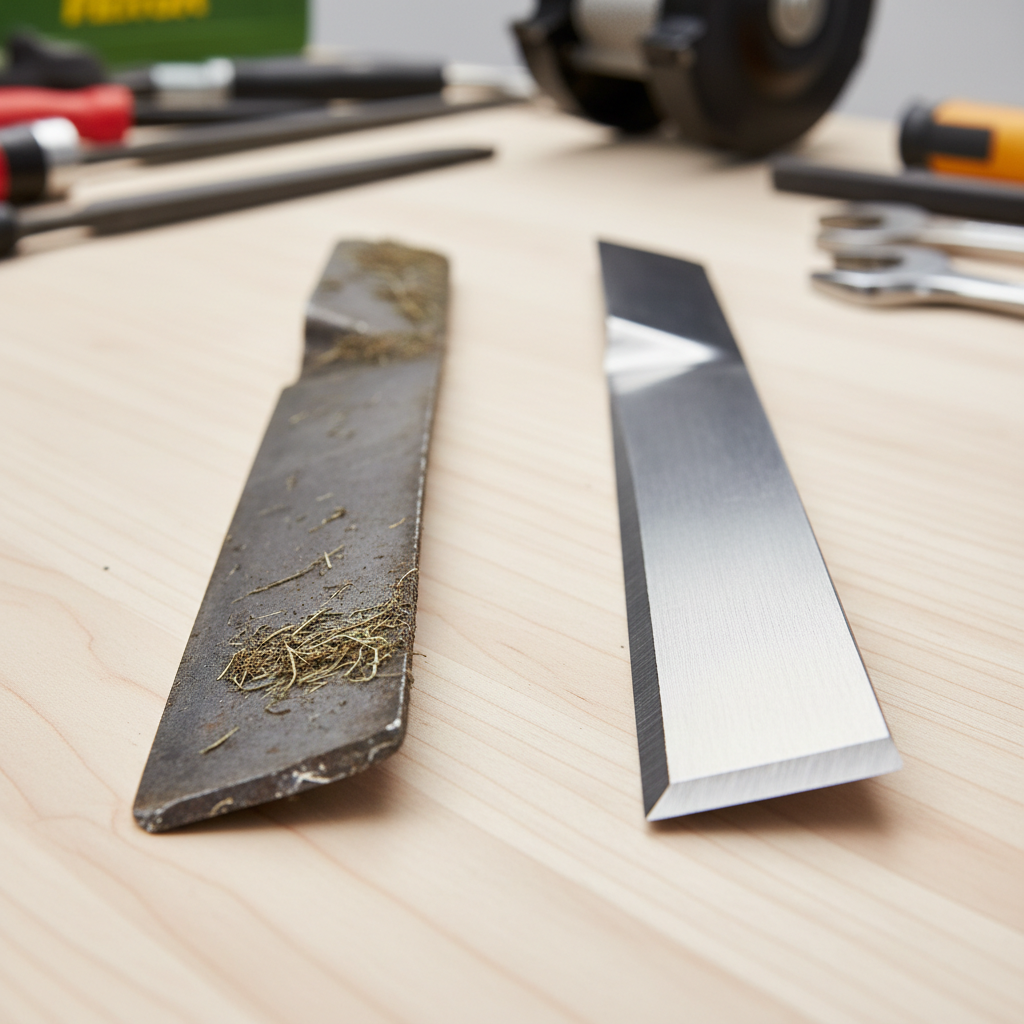
What “sharp enough” means (and the bevel you should aim for)
A common misconception is that mower blades should be knife-sharp. In many cases, a slightly “buttery” sharp edge holds up better because it’s less fragile when it hits grit.
- Keep the factory bevel: You’re refreshing an angle, not inventing a new one.
- Avoid thinning the edge: Too thin dulls fast and can chip more easily.
- Stay consistent end-to-end: Inconsistent bevel can create uneven lift and cut.
If you’re unsure about the original bevel, checking your mower manual or the blade manufacturer guidance is safer than guessing. According to Consumer Product Safety Commission (CPSC)..., powered equipment maintenance should prioritize safe handling and proper guarding, which is a good reminder not to rush this job.
Step-by-step: sharpen a mower blade safely and evenly
This workflow fits most walk-behind and many riding mowers, but designs vary. If your mower has unusual fasteners or a stacked blade setup, the manual can prevent a lot of frustration.

1) Prep and safety
- Disconnect power: unplug electric mowers, remove the battery, or disconnect the spark plug wire on gas models.
- Wear gloves and eye protection, especially if using any powered sharpener.
- Stabilize the mower or remove the blade and clamp it in a vise.
2) Mark and inspect
- Use a marker on the bevel so you can see where you’re removing metal.
- Inspect for cracks, bends, or missing chunks. If damage looks structural, replacement is often safer than repair.
3) Sharpen with your chosen tool
- File: push in one direction along the bevel, keep the same angle, count strokes to stay even.
- Drill attachment: keep steady pressure, let the abrasive do the work, avoid digging in at the tip.
- Bench/angle grinder: use light passes, pause to limit heat, and stop once the edge looks uniform.
One practical rule: remove the minimum metal needed to clean up nicks and restore a consistent edge. If you’re “chasing perfection” and grinding for ten minutes, you’re usually shortening blade life.
4) Balance the blade (don’t skip this)
Balancing is what prevents vibration that can wear bearings, loosen fasteners, and make mowing feel rough. A simple cone balancer works for most blades, and the check is quick.
- If one side drops, that side is heavier.
- Remove a small amount of material from the heavier side, then re-check.
5) Reinstall correctly
- Install the blade facing the right direction, many blades have “grass side” markings.
- Tighten to manufacturer torque guidance when available.
- Do a short test run, listening for new vibration.
Mistakes that waste time (or make the cut worse)
- Overheating the edge: Aggressive grinding can change temper, the edge may dull faster.
- Changing the bevel angle: A steeper or shallower angle can reduce lift or create tearing.
- Ignoring balance: “It looks sharp” doesn’t matter if it shakes the mower.
- Sharpening a damaged blade: Cracks and bends are not DIY-friendly in many cases.
- Skipping cleaning: Buildup hides damage and makes sharpening inconsistent.
When to replace the blade or call a pro
A lawn mower blade sharpener tool is great for routine edge refreshes, but it can’t fix everything. These are the situations where a shop visit or replacement often makes more sense.
- Cracks, deep chips, or metal missing near the cutting edge
- Blade bend or repeated vibration even after balancing
- Severe corrosion pits along the edge
- Commercial mowing schedules where downtime costs more than service
If you’re uncertain about blade integrity, it’s reasonable to consult a small engine shop. With spinning parts, “probably fine” is not a great standard.
Practical buying tips (what to look for before you click “add to cart”)
- Match your comfort level: controlled sharpening beats faster sharpening for most homeowners.
- Check blade width and access: some decks leave little room to sharpen in place.
- Add a balancer to the cart: it’s inexpensive and solves a real problem.
- Look for repeatability: guides, jigs, and consistent abrasives help you get the same result each time.
Key takeaways: keep the factory bevel, remove minimal metal, balance every time, and treat structural damage as a replacement decision rather than a sharpening challenge.
Conclusion: a sharper blade is usually a calmer mower and a cleaner lawn
A consistent edge and proper balance tend to deliver the biggest “wow” in real mowing: the lawn looks cleaner, the mower feels smoother, and you stop fighting clumps and missed strands. Pick a sharpener you can control, then repeat the same process each time instead of improvising.
If you want one next step, do this: inspect your blade today and decide whether you need a simple touch-up or a full sharpen-and-balance session, then set a reminder to check it again after a few tough mows.
FAQ
- How often should I sharpen a mower blade?
Many homeowners sharpen once or twice a season, but it depends on sand, mowing hours, and impacts. If the grass tips fray or you see nicks, it’s usually time. - Is a drill attachment good enough for most people?
Often yes, especially for routine sharpening. It’s easier to control than freehand grinding, but you still need to keep the bevel consistent and balance afterward. - Can I sharpen without removing the blade?
Some people do, but stability and access vary by mower. Removing the blade and clamping it typically gives better control and safer body positioning. - What grit should I use for sharpening?
There isn’t one perfect grit, but medium abrasives commonly work well for restoring an edge without removing excessive metal. For heavily damaged blades, you may start coarser and finish finer. - Do I need to balance the blade every time?
In most cases, yes. Even small metal removal on one side can create vibration, and balancing takes only a couple minutes with the right tool. - Why does my mower vibrate after sharpening?
The most common cause is imbalance, but it can also be a bent blade or an issue with the spindle area. If balancing doesn’t fix it, consider professional inspection. - Should mower blades be razor sharp?
Usually no. A clean, consistent edge with the correct bevel is the goal, and overly thin edges can dull faster when they hit grit.
If you’re trying to choose a lawn mower blade sharpener tool and want a more “set it up and repeat it” approach, consider pairing your sharpener with a basic balancer and a secure clamping setup, it tends to save time and reduce trial-and-error across the season.