
Drywall corner bead tool choices can make or break your outside corners, because a corner that looks “almost straight” before mud often turns into waves, cracks, and extra sanding after paint shows every flaw. If you keep fighting proud bead edges, soft corners, or metal bead that won’t sit flat, it’s usually not your technique alone, it’s the tool and bead system not matching the job.
Outside corners get abused, bumped by furniture, hit by vacuums, and telegraph imperfections under raking light. That’s why pros obsess over bead selection, fastening method, and how the first coat gets applied. Fixing corners after the fact is slow, dusty, and frustrating.
This guide breaks down what a corner bead tool actually does, which styles fit paper-faced, vinyl, and metal bead, and a practical workflow you can repeat room after room. You’ll also get a quick self-check, a comparison table, and the mistakes that cause most callbacks.
What a drywall corner bead tool really does (and what it can’t)
A drywall corner bead tool is any tool designed to set the bead straight, embed it consistently, and shape compound so you build a crisp corner without burying the bead or sanding forever. In practice, that usually means one of these functions:
- Alignment: holding the bead centered on the corner while you fasten or bed it.
- Pressure control: pressing paper-faced bead into compound evenly so you don’t starve the edges.
- Profile shaping: creating a consistent “feather” on both sides to reduce ridges.
What it can’t do is compensate for a bad corner. If framing is bowed, drywall edges are broken, or the corner is out of plumb, no tool magically fixes that. You can still get a clean finish, but you may need shimming, pre-fill, or a different bead type.
Key point: corners are a system, bead + fastening method + compound choice + the tool that matches all three.
Common types of corner bead tools (and when each makes sense)
People often search “corner bead tool” expecting one universal gadget. Reality is messier: the “right” tool depends on bead type and whether you’re using nails/screws, staples, spray adhesive, or setting compound.
1) Roller-style bead embedder
Typically used with paper-faced bead or certain composite beads. The roller helps press the bead into wet mud with even pressure so you don’t crush one side while the other floats.
- Good for: long hall corners, consistent embed, fewer bubbles under paper.
- Watch for: starving the edges if you run it too hard on a thin bed.
2) Corner bead crimper (metal bead)
A crimper “dimpling” tool bites metal bead onto drywall, reducing fasteners and helping the bead hold position while you coat.
- Good for: standard metal bead on straight corners, fast positioning.
- Watch for: irregular framing; crimping can lock a wavy bead in place.
3) Specialty trowels and corner knives
Outside corner trowels, angle tools, and corner knives don’t set the bead, they shape coats fast and consistently after the bead is secure.
- Good for: production finishing, consistent radius on outside corners.
- Watch for: loading too much mud and creating a wide “hump.”
4) Bead hopper / applicator (for paper-faced systems)
This applies compound to the bead flanges evenly before placement, a big help for speed and consistency.
- Good for: multiple rooms, repetitive work, reducing voids.
- Watch for: wrong mud consistency, too thick won’t wet out the paper.
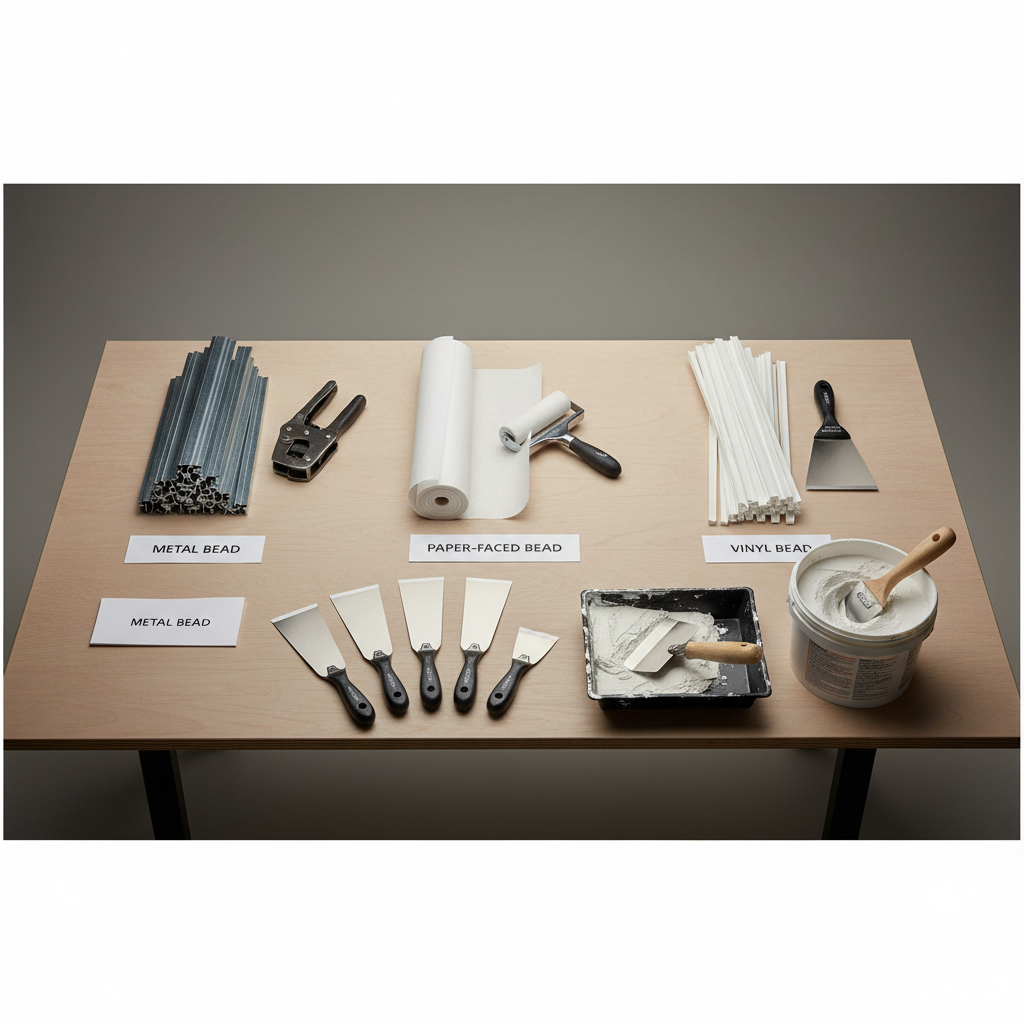
Quick comparison table: bead type, best tool, and typical trade-offs
Use this as a starting point, then adjust for abuse level, moisture risk, and how straight the corner is.
| Bead type | Typical “best-fit” tool | Why it works | Common downside |
|---|---|---|---|
| Metal corner bead | Crimper + 6"/10" knives | Fast hold, crisp edge | Can telegraph waves if corner is off |
| Paper-faced composite | Roller embedder or bead hopper | Strong bond, fewer nail pops | Paper can bubble if bedding is uneven |
| Vinyl/PVC bead | Staples + corner knife | Resists rust, flexible | Needs correct fastening to avoid flare |
| Impact-resistant composite | Manufacturer system tools | Durable in high-traffic areas | Cost and learning curve can be higher |
Why corners fail: real-world causes you can spot early
Most corner problems show up later, but the causes are usually visible the day you hang board. Here’s what tends to create ugly corners even with a decent drywall corner bead tool.
- Corner isn’t straight: twisted studs, crowned lumber, or a drywall edge that’s crushed from handling.
- Wrong bead for the area: metal in damp zones can rust, lightweight bead in a busy hallway can dent.
- Inconsistent bedding: too little compound under paper-faced bead leads to bubbles and weak bond.
- Over-fastening: too many nails/screws can flare the bead and create a “camel hump” profile.
- Compound mismatch: premix vs setting compound choice affects shrinkage, working time, and hardness.
According to GA-216 (Gypsum Association application standard), corner reinforcement and joint treatment need to follow recognized methods and compatible materials, especially around fasteners and bedding practices. That sounds formal, but the takeaway is simple: don’t mix a bead method with mud consistency that the system can’t tolerate.
Self-check: which tool and method fits your job?
If you want to stop guessing, answer these quickly. You’ll usually land on one or two workable setups.
- Is the corner straight within reason? If not, plan on shimming or using a more forgiving bead system, then use your tool to keep it centered rather than forcing it flat.
- High-traffic area? Entryways, garages, hallways often justify impact-resistant bead.
- Moisture or coastal air? Consider vinyl/composite and corrosion-resistant fasteners.
- Do you hate sanding? Choose tools that shape coats cleanly, like an outside corner trowel, and focus on thin, controlled passes.
- How many corners? One bathroom corner is different from a whole remodel; a bead hopper or roller embedder pays off with volume.
Rule of thumb: if you’re doing paper-faced bead, prioritize consistent embed pressure; if you’re doing metal, prioritize alignment without flaring.
Step-by-step: a repeatable workflow for cleaner outside corners
This is a practical sequence many finishers stick to, adjusted by bead type. Keep your goal narrow: straight bead, tight bond, thin coats.
Prep the corner (skip this and you’ll chase defects)
- Rasp or trim fuzzy drywall edges, then remove dust.
- Fix gaps and broken corners with setting compound if needed, let it firm up.
- Check the corner with a straightedge, mark high spots so you don’t bury them with mud.
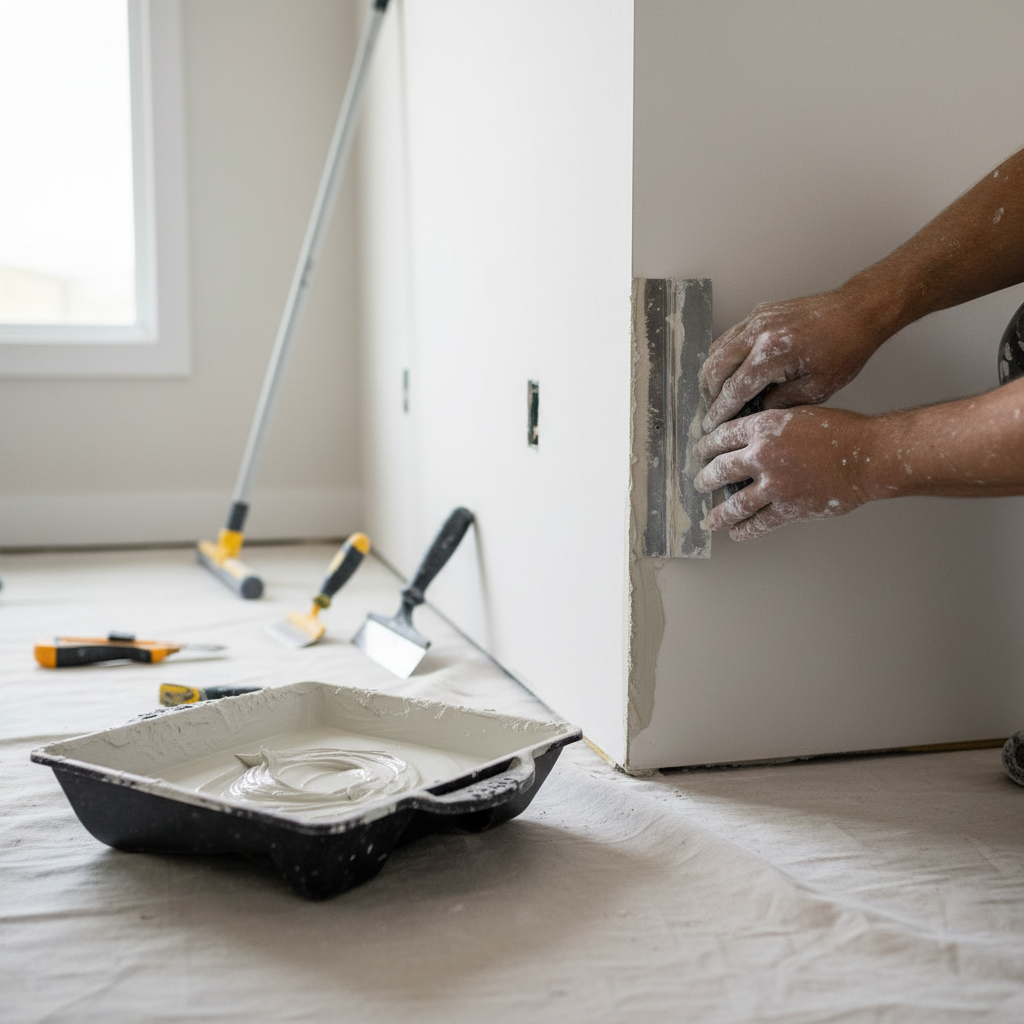
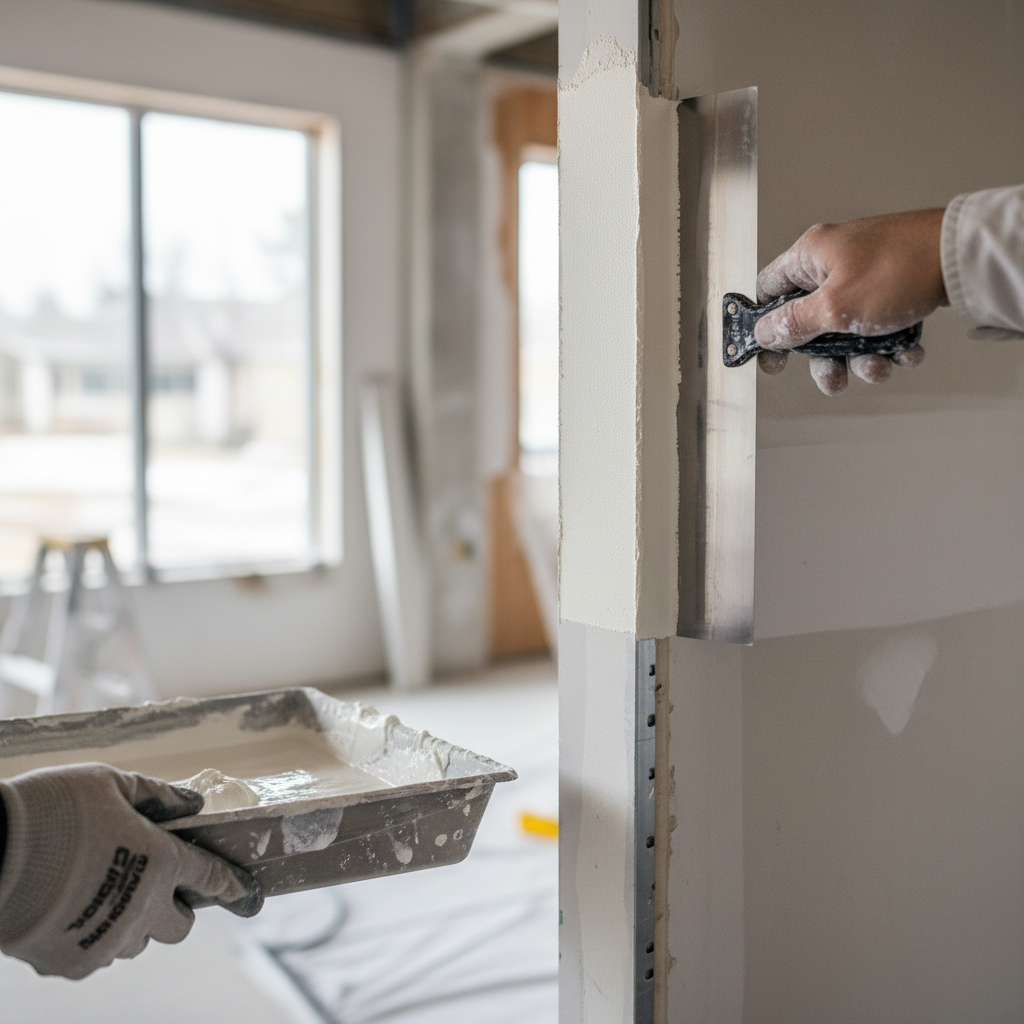
Set the bead
- Paper-faced bead: apply an even bed of compound along both sides, place bead, then use a roller-style embedder to seat it without starving edges.
- Metal bead: position bead, crimp lightly to hold, then add fasteners only as needed to keep it tight and straight.
- Vinyl/composite: follow the manufacturer method, staples or adhesive often behave differently than screws.
First coat (where most ridges are born)
- Use a 6" knife to fill and cover the flange area, keep the crown clean.
- Feather outward, but don’t build a wide mound. Thin beats thick.
- Let it dry fully before deciding it needs more mud. Many corners look bad halfway through.
Second coat and shape
- Switch to a 10" or 12" knife, or an outside corner trowel if you like that profile.
- Work one side at a time if you tend to nick the other side.
- Keep the corner line crisp by wiping the crown lightly, not burying it.
Final touch and sanding
- Spot-fill imperfections, then sand with a light touch and a sanding sponge to avoid flat spots.
- Use a work light at a low angle, it shows ridges before paint does.
Mistakes that waste time (even if your tool is “right”)
- Trying to fix crooked framing with mud: you’ll end up with a fat corner that still looks wrong.
- Running tools too dry: a roller embedder with insufficient compound can create dry voids under paper.
- Over-crimping metal bead: aggressive crimping can dent the nose and telegraph through finish coats.
- Too much water in mud: easier spreading feels nice, but shrinkage and edge cracking become more likely.
- Skipping dry time: recoating damp mud drags and pills, then you sand twice as much.
According to OSHA, silica exposure from drywall sanding dust is a real jobsite concern, so wet-sanding methods, proper ventilation, and appropriate respiratory protection may be worth discussing with a qualified safety professional for your setting. Even for DIY, dust control pays back immediately.
When it’s worth asking a pro (or changing the plan)
Some corner issues look like “finishing problems” but are really substrate problems. Consider professional help, or at least a second set of eyes, when:
- The corner is visibly out of plumb across a tall wall, and you need it to meet cabinets, tile, or trim cleanly.
- You see recurring cracks at corners, which can suggest movement, improper fastening, or structural shift.
- You’re finishing moisture-prone areas and aren’t sure which bead system stays stable long term.
A short consult can be cheaper than redoing corners after primer reveals everything.
Conclusion: choose the tool that matches the bead and the corner
Clean outside corners come from a simple pairing: the right bead for the space, a drywall corner bead tool that sets it consistently, then thin coats that build shape without building bulk. If you take only two actions, make them these: check corner straightness before bead, and use a method that controls pressure and alignment rather than fighting the bead with extra mud.
If you’re starting a room, pick one corner approach and stick with it through the project, consistency matters more than chasing a “perfect” trick from five different videos.
FAQ
- What is the best drywall corner bead tool for beginners?
Many beginners do well with paper-faced bead plus a roller embedder because it helps with even pressure, but if you’re already set up for metal bead, a simple crimper can reduce the “third hand” problem. The best choice depends on which bead you can install consistently. - Do I need a corner bead crimper or can I just nail metal bead?
You can fasten metal bead without a crimper, but crimping often helps hold alignment while you place fewer fasteners. On wavy corners, though, crimping can lock in the wave, so it’s not automatically better. - Why does paper-faced corner bead bubble after embedding?
Usually it’s uneven bedding compound, mud too thick to wet the paper, or pressing too hard and starving the edges. Pull a section back early if needed, add compound, then re-embed with controlled pressure. - Should I use setting-type compound for corners?
Setting compound can be helpful for pre-fill and for areas needing faster build with less shrink, but it sets quickly and can be harder to sand. Many people mix approaches: setting mud for repairs, premix for finish coats. - How do I stop outside corners from cracking?
Cracks often come from movement, poor bond under the bead, or building too much compound that shrinks. Make sure the bead seats tight, use compatible materials, and avoid over-watering mud. If cracks repeat, consider that the wall assembly may be moving. - Metal vs vinyl corner bead: which finishes straighter?
Metal can finish very crisp on straight framing, vinyl/composite can be more forgiving in minor irregularities and avoids rust concerns. “Straighter” usually comes down to installation and how true the corner is. - How wide should I feather mud on an outside corner?
A common finish lands with wider feathering on later coats, but you don’t want a wide hump. If the corner looks bulky in side light, reduce mud load and widen only enough to hide the flange edge.
If you’re deciding between bead types, or you want a more predictable setup for multiple rooms, it can help to pick a corner system and tool set that matches your pace and tolerance for sanding, even a small change like switching embed tools often saves hours over a full house.