
how to install a grease fitting on a tool comes down to two things: matching the fitting thread to the tool body, and preparing clean, accurate threads so grease goes where it should instead of leaking out.
If you have a tool or attachment with a wear point, bushing, pivot, or sliding surface, adding a grease fitting can extend service life and cut down on squeaks, heat, and premature slop. But a rushed install can strip threads, crack thin castings, or leave you with a fitting that spins and never seals.

One common misconception: “Any zerk will do.” In reality, thread type, wall thickness, and whether the tool has an internal grease path all change the right approach. This guide walks through the practical choices, a quick self-check, and a step-by-step install you can actually follow in a garage or shop.
Pick the right grease fitting (before you touch a drill)
Most headaches start with the fitting selection. If you choose a thread that’s too large for the material, or a style that doesn’t clear your grease gun coupler, you end up redoing the job.
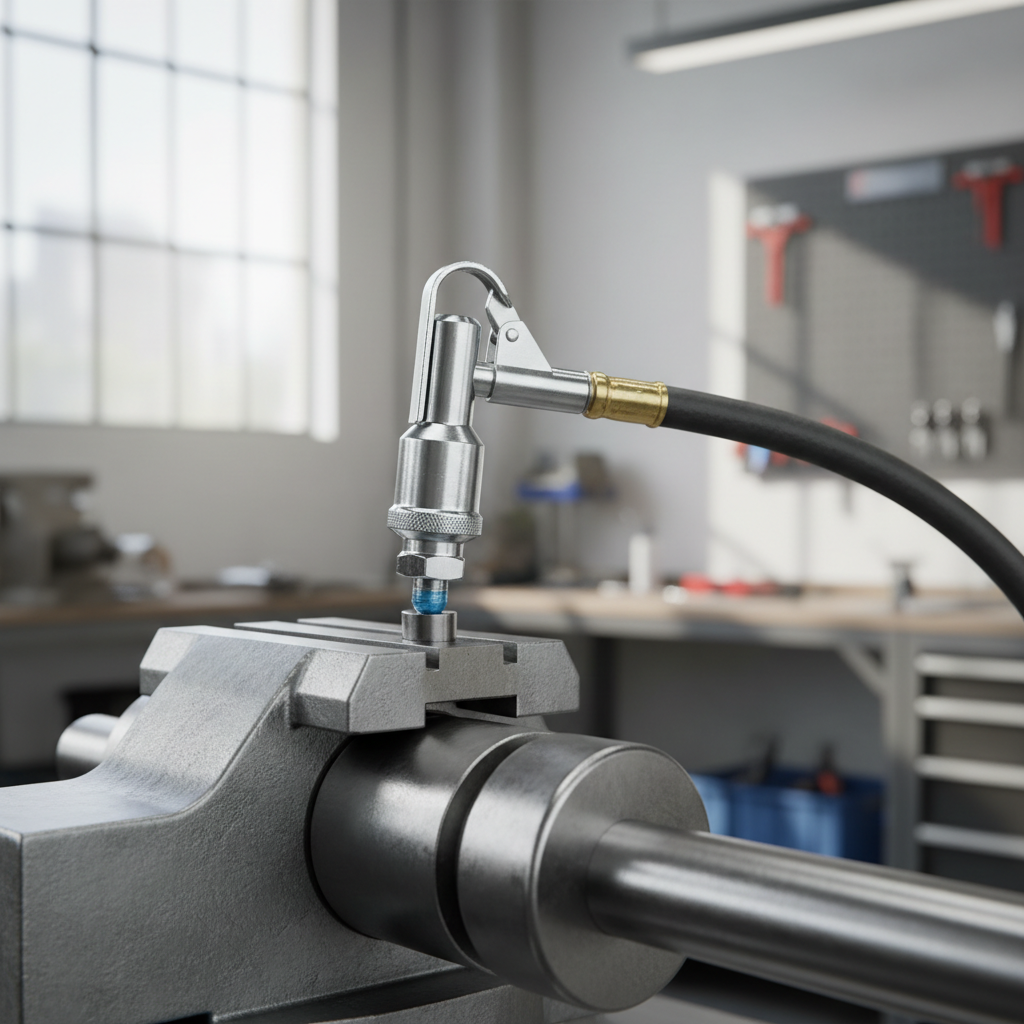
- Thread type: In the US, common options are SAE (like 1/4-28) and NPT (like 1/8-27). NPT is tapered and seals by wedging, SAE is straight and typically seals with a shoulder or thread sealant.
- Angle: Straight, 45-degree, and 90-degree fittings exist for access. If you can’t get the coupler on comfortably, lubrication won’t happen consistently.
- Head style: Standard zerk (ball check) is typical; low-profile and button-head fittings fit tighter spaces but need the right coupler.
- Material: Steel works for most tools; stainless helps in corrosive or washdown environments, but can be easier to gall in some threads.
Practical rule: if you’re unsure, pick the smallest fitting that still gives reliable access for the grease gun, and confirm you have enough wall thickness for threads.
Tools and materials checklist (and what each is for)
You can install a fitting with basic shop tools, but the right tap and drill size matter more than fancy gear.
- Grease fitting (size/style selected)
- Drill and correct drill bit for the tap
- Tap matching the fitting thread (and a tap handle)
- Center punch and hammer for accurate hole start
- Cutting fluid (helps reduce chatter and broken taps)
- Deburring tool or countersink
- Thread sealant appropriate to the fitting type (often helpful; not always required)
- Grease gun with a coupler that fits your fitting
- Shop rags and eye protection
According to OSHA, eye protection is recommended when performing tasks that can create flying particles, including drilling and tapping metal. If you’re doing this on a powered tool or assembly, isolate energy sources and keep hands clear of pinch points.
Quick self-check: is your tool a good candidate for a fitting?
Before drilling, do a fast reality check. This prevents the classic mistake of adding a zerk to a part that has nowhere for grease to go.
- There’s a lubricated interface: pivot pin, bushing, slide, or bearing surface that actually benefits from grease.
- You can reach it: a coupler can snap on without fighting the frame or guard.
- There’s enough material: thin-wall tubing or small cast features may crack or strip.
- Grease has a path: ideally there’s a cross-hole, groove, or cavity that can distribute grease rather than dead-ending.
- You can control chips: if metal chips will fall into gears or sealed bearings, pause and rethink the plan.
If two or more items feel questionable, you may still be able to do it, but it’s time to slow down and plan access, thickness, and chip control.
Thread selection cheat sheet (table)
This isn’t every thread on the market, but it covers what many US users run into with common grease fittings.
| Fitting thread (common US) | What it’s like | Typical use | Notes |
|---|---|---|---|
| 1/4-28 SAE (straight) | Fine, straight thread | Many automotive/light equipment points | Usually needs a clean shoulder seat; sealant may help if surface isn’t perfect |
| 1/8-27 NPT (tapered) | Tapered, self-sealing | Heavier cast parts, housings | Easy to overtighten in softer metals; go gradual |
| M6x1 (metric straight) | Metric straight thread | Some imported tools/equipment | Don’t “make it fit” with SAE taps; confirm with a gauge or spec |
If you don’t know what thread you need, bring the fitting assortment and a thread gauge to the bench, or pick a fitting first and commit to drilling/tapping to match it.
Step-by-step: drill, tap, install, and prove grease flow
Most installs succeed when you treat it like a precision hole, not “just a quick zerk.”
1) Choose the location and confirm internal clearance
Mark a spot that feeds the wear point and gives grease gun access. If possible, look inside the part or reference a drawing so you don’t drill into a pin, spring, or thin edge.

2) Center punch, then drill the tap hole
Center punch keeps the bit from walking. Drill a small pilot hole if you’re working with hard steel or a curved surface, then drill to the proper tap size. Use cutting fluid and keep the drill square to the surface.
- Key point: a hole that’s too small makes tapping miserable and increases broken-tap risk.
- Also key: a hole that’s too large gives weak threads and leaks.
3) Deburr the entry
A light countersink or deburr helps the tap start straight and helps the fitting seat cleanly. Don’t go crazy; you’re just breaking the sharp edge.
4) Tap the threads carefully
Start the tap straight. Apply cutting fluid and turn slowly. If you feel binding, back out, clear chips, and continue. For many materials, a rhythm of turning forward, then backing off slightly to break chips, reduces sticking.
- Depth control: for NPT, you usually don’t tap all the way through; you tap until the fitting tightens and clocks where you want.
- For straight threads: tap to full engagement so the fitting can seat at the shoulder.
5) Clean chips and test-fit
Clean the hole and surrounding area. If chips can enter a mechanism, take extra time here. Test-fit the zerk by hand first; it should start smoothly without cross-threading.
6) Install the grease fitting and orient it
Snug it down, then stop. Over-torquing is where cast parts crack and thin sections deform. If you’re using thread sealant, use a small amount and keep the passage clear.
7) Pump grease and confirm it actually reaches the wear point
Couple the grease gun and pump slowly. You want to see grease purge at a relief point or feel resistance change as the cavity fills. If grease immediately leaks around the threads, you likely have poor thread engagement, damaged threads, or the wrong thread type.
Troubleshooting: when it leaks, won’t take grease, or the fitting breaks
These issues are common, and most are fixable without scrapping the part, but you need to diagnose the cause, not just tighten harder.
- Grease won’t go in: the ball check may be stuck, the passage may be blocked, or you drilled into a dead-end with no distribution path. Try a new fitting first, then inspect passage design.
- Grease leaks at threads: thread mismatch, oversized hole, cross-threading, or shallow NPT engagement. A re-tap to correct depth sometimes helps; a thread repair insert may be needed in softer metals.
- Fitting shears off: impact from use, wrong angle choice, or overtightening. Switch to a 45/90 fitting for clearance, or a more protected location.
- Tap breaks: hole too small, tap started crooked, not clearing chips, or hard material without proper cutting fluid. Removing a broken tap can be difficult; consider professional help depending on part value.
If you’re stuck, it helps to step back and ask one blunt question: “Did I create a reliable grease path, or did I only add a port?” A fitting is just the doorway.
Key takeaways (so you don’t redo the job)
- Match fitting thread and tap, don’t guess or force it.
- Plan access so the grease gun can connect without bending the fitting.
- Control chips, especially near moving parts, seals, and bearings.
- Don’t overtighten; most damage happens at the final quarter turn.
- Prove grease flow right after install, before putting the tool back in service.
When to get professional help (and why it’s not overkill)
If the part is expensive, safety-critical, or hard to replace, professional support can be the cheaper path. The big flags are thin castings, unknown alloys, or any time you can’t keep metal chips out of the internals.
Also consider a machinist or repair shop if you need thread repair inserts, if a tap breaks in the hole, or if you’re modifying equipment still under warranty since modifications can change coverage depending on the manufacturer.
Conclusion: a clean install beats a “tight” install
Installing a grease fitting is very doable in a home shop, but the win comes from discipline: pick the right fitting, drill the correct tap hole, cut clean threads, then verify grease reaches the contact surface. If you do those steps well, the tool gets easier maintenance for years instead of one frustrating leak point.
If you want an easy next move, lay out your fitting options, choose the location, and do a dry run with the grease gun coupler before drilling, that small check prevents a lot of regret.
If you need a more hands-off option, a local machine shop can often add a fitting and grease channel in one visit, which tends to matter most on high-load pivots or parts you really don’t want to replace.