
wall hook kit hanging easy is the phrase people end up searching after the third crooked frame, the fourth extra hole, and the moment a “quick hang” turns into a patch-and-paint weekend.
If you want pictures to sit straight, stay put, and come off without drama later, the fastest path is not “more nails,” it’s matching the hook type to your wall, frame weight, and how permanent you want the result to be. That’s what a good hanging kit does, it removes guesswork.
One more thing people often miss, “easy” doesn’t mean the same hook works everywhere. Drywall, plaster, brick, tile, studs, even older lath walls behave differently, and the wrong fastener is why frames tilt or pull out.
This guide breaks down what’s usually inside an easy hanging wall hook kit, how to choose the right pieces, and a step-by-step process you can reuse for almost any picture wall.
What an “easy hanging” wall hook kit usually includes (and what each piece is for)
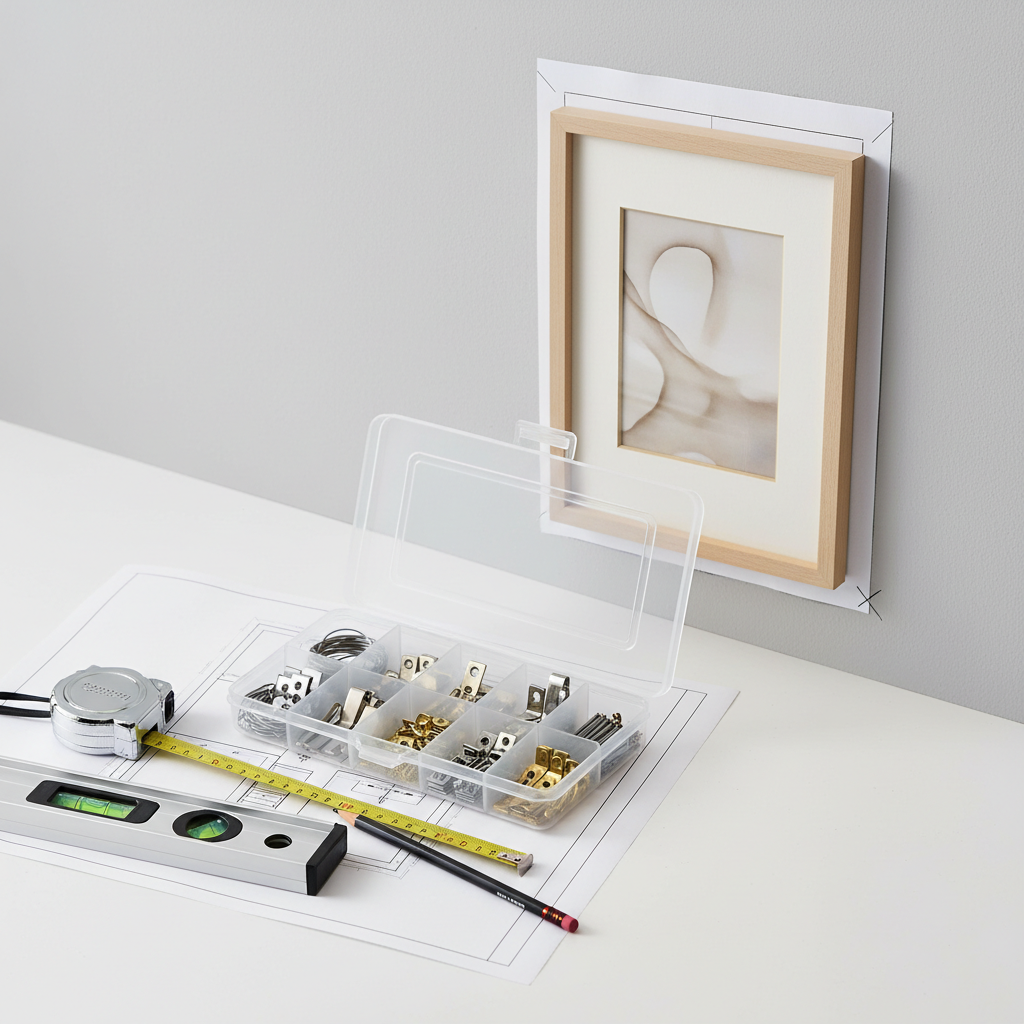
Most wall hook kits look similar on the outside, but the contents matter more than the count. A kit that includes multiple load ratings and at least two anchor styles tends to feel “easy” because you’re not improvising mid-project.
- Hardwall picture hooks: small hooks with angled nails, common for drywall and plaster, quick to install.
- Sawtooth and D-ring hardware: frame-side options that change how stable the frame feels.
- Wall anchors: for heavier frames or when you can’t hit a stud, typically plastic expansion anchors or self-drilling anchors.
- Adhesive hooks/strips: helpful for rentals or light frames, but sensitive to surface and weight limits.
- Basic tools: some kits include a mini level, measuring guide, or template; these can save time more than extra hooks do.
According to CPSC (U.S. Consumer Product Safety Commission)... unsecured wall-hung items can contribute to tip-over and falling-object hazards, especially when heavy frames or mirrors are involved. You don’t need to panic, just treat heavier items like a small safety project, not a craft project.
Why pictures end up crooked or fall, even with a “good” kit
When a picture slips after a week, it’s usually one of these practical issues, not “bad luck.”
- Wrong hook rating for real weight: frame weight plus glass plus backing can surprise people, and packaging ratings assume correct installation.
- No stud when you need one: anchors can work, but some walls crumble, and some anchors are picky about hole size.
- Frame hardware mismatch: a single center hanger can rotate; two D-rings with wire can reduce swing if set up correctly.
- Wall surface problems: glossy paint, dusty drywall, or textured plaster can reduce grip for adhesive systems.
- Measurement shortcuts: eyeballing “centered” often becomes “why does this look off?” once furniture is in place.
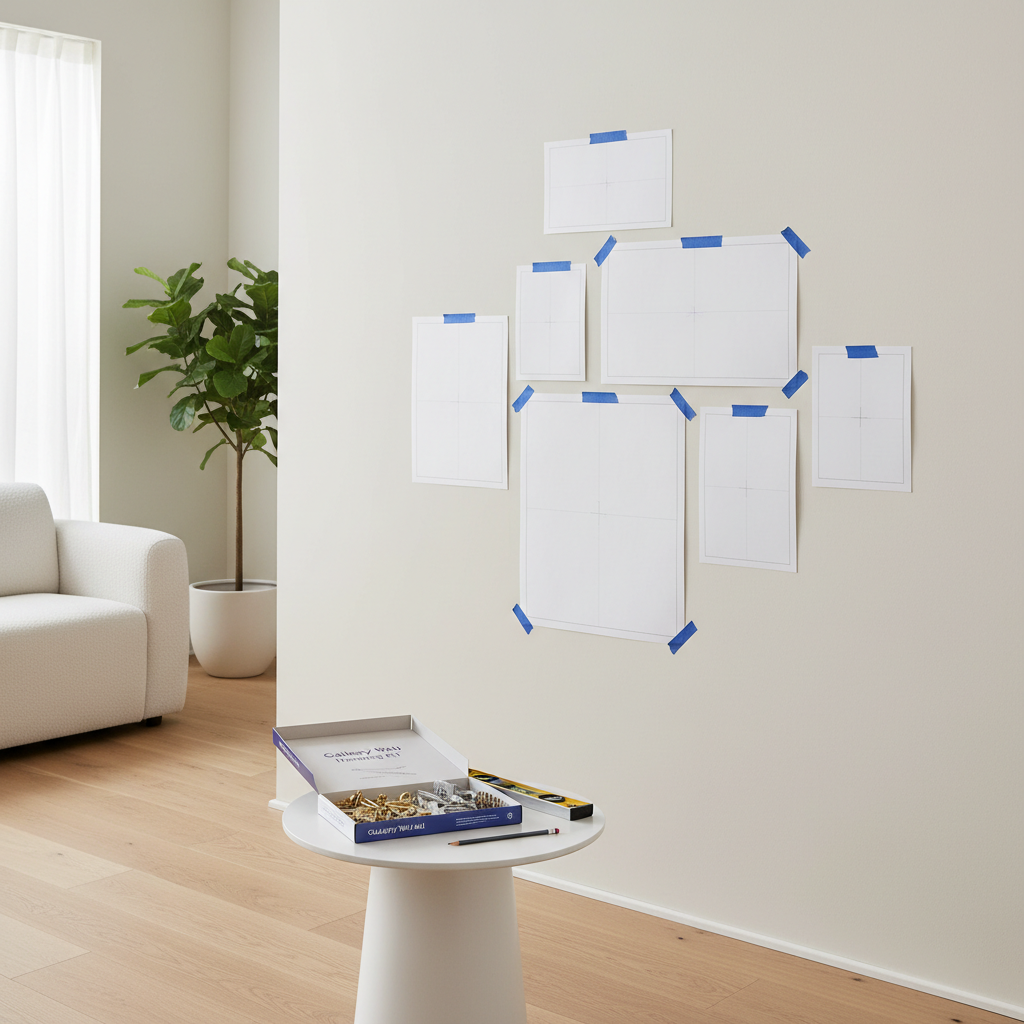
If you’re using a wall hook kit hanging easy for a gallery wall, this gets amplified because small errors repeat and turn into a “drifting grid” across the whole layout.
Quick self-check: choose the right hook type in 60 seconds
Before you open the kit and start punching holes, pause and sort your project into a bucket. This is the part that keeps things easy.
- Wall type: drywall, plaster, brick/concrete, tile, or wood paneling.
- Item weight: check the frame label, weigh it, or estimate conservatively if unsure.
- Hanging style: one point (single hook) vs two points (two hooks or two D-rings).
- Damage tolerance: rental-friendly vs “small holes are fine.”
- Traffic and risk: above a bed, above a sofa, near kids or pets, treat it as higher stakes.
Rule of thumb that holds up in many homes: light frames can use hardwall hooks or adhesive systems if the wall is clean and smooth, midweight frames often do best with anchors or studs, and anything heavy should be planned around studs or masonry fasteners appropriate to the surface.
Practical comparison table: common kit options and when they work
Not every kit matches every wall. Use this table as a quick filter while shopping or when deciding which baggie to open first.
| Hook/fastener type | Best for | What can go wrong | Good fit if you want “easy” |
|---|---|---|---|
| Hardwall picture hook (angled nails) | Drywall, some plaster, light-to-mid frames | Nails bend, wall crumbles, wrong angle | Fast installs with small holes |
| Plastic expansion anchor + screw | Drywall for midweight items | Oversized hole, anchor spins | More holding power than a nail |
| Self-drilling drywall anchor | Drywall when no stud is available | Blows out weak drywall, misalignment | Quick, no pre-drill in many cases |
| Adhesive hook/strip system | Smooth painted walls, light frames, rentals | Fails on texture/dust, weight creep | Minimal wall damage when used correctly |
| Stud mount (screw into stud) | Heavy frames, mirrors, high-traffic areas | Missed stud, wrong screw length | Most stable, least surprise later |
Step-by-step: hang pictures neatly with a wall hook kit
This is the repeatable process that keeps walls tidy. It works whether you’re hanging one photo or building a whole picture wall.
1) Plan the height and spacing before you commit
- For a single frame, many people like the center around eye level, but furniture, ceilings, and art size can change what “looks right.”
- For a group, lay it out on the floor first or use paper templates on the wall.
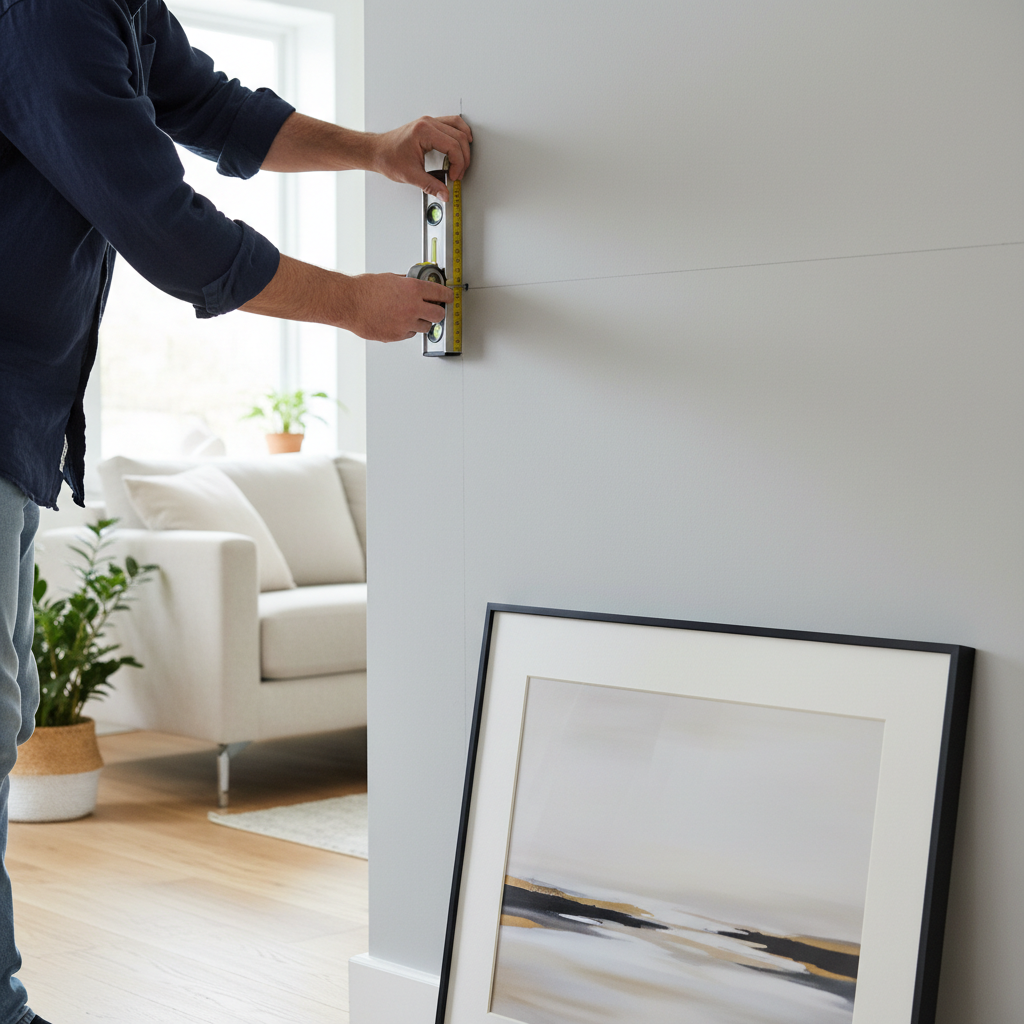
2) Mark the exact hook point, not the “top of frame” guess
- Measure from the top of the frame down to the hanging hardware point, then transfer that measurement to the wall mark.
- If you use wire, pull it taut as it will hang, that sag matters.
3) Pick the fastener based on wall type and risk
- Drywall: hardwall hook for light frames, anchor or stud screw for heavier pieces.
- Plaster: pre-drill can reduce cracking, go slowly.
- Masonry: use masonry-rated hardware and a proper bit, if you’re unsure, ask a hardware pro.
4) Install, then level with tiny adjustments
- Set the hook, hang the frame, check level, then make micro shifts by reseating the hanger, not by widening holes.
- For two-point hanging, measure twice so both points land at the same height.
Key point: if “easy” is your priority, use two hang points for frames that love to rotate, and reserve single-hook hanging for pieces that stay balanced naturally.
Room-by-room tips: what changes in real homes
Walls aren’t equal across a house. Humidity, traffic, and wall materials quietly affect how well a hook setup holds.
- Living room: higher traffic means more bumps, heavier art benefits from studs or higher-capacity anchors.
- Bedroom: above-bed hanging deserves extra caution, if the item is heavy or glass-fronted, consider stud mounting and appropriate hardware.
- Bathroom: humidity can weaken some adhesives over time, mechanical fasteners often behave more predictably.
- Hallways: narrow paths invite shoulder bumps, aim for tighter-to-wall hanging hardware and stable two-point support.
If your kit is marketed as wall hook kit hanging easy, it may include adhesive options, treat those like a “surface prep” project, clean the wall and follow cure times, because skipping that is how “easy” becomes “it fell overnight.”
Mistakes to avoid (the ones that waste the most time)
- Trusting the label without checking conditions: ratings assume correct wall type and installation depth.
- Over-tightening screws into anchors: it can strip the anchor and reduce hold.
- Using one hanger for a wide frame: wide frames tend to spin, two points usually look calmer.
- Mixing hardware randomly: a heavy frame with a flimsy sawtooth hanger is a mismatch.
- Rushing layout: one extra minute with a level saves ten minutes of rework.
When to get extra help (and what “help” means here)
If you’re hanging a mirror, a large framed print, or anything heavy above seating or a bed, it’s reasonable to slow down and consider a professional installer or a handyman, especially if you suspect plaster issues or you’re dealing with masonry drilling. If you’re in a rental, you may also want to check your lease terms for wall alterations.
For uncertainty about load limits, wall condition, or child safety concerns, asking a qualified local professional is often cheaper than repairing a wall and replacing a broken frame.
Conclusion: make “easy” mean predictable, not temporary
A wall hook kit hanging easy works best when you treat it like a small system, choose the hook based on wall and weight, measure the real hang point, and use two supports when a frame wants to twist.
If you do one thing today, weigh or estimate your frames conservatively, then pick hardware that fits that bucket. If you do a second thing, mark your hook points with a level before making any holes, your future self will thank you.
FAQ
What is the easiest wall hook kit for hanging pictures on drywall?
For many drywall situations, kits that include hardwall picture hooks plus at least one anchor option feel easiest, because you can handle both light and midweight frames without a separate shopping trip.
Can I use a wall hook kit hanging easy on plaster walls?
Often yes, but plaster can crack or crumble, so going slow and pre-drilling may help. If the wall feels fragile or the item is heavy, it’s worth getting advice at a local hardware store or from a pro.
Why does my frame keep tilting even after I level it?
Usually the hanger point allows rotation, or the wall hook sits slightly off-center. Switching to two D-rings (two hooks) or adjusting wire tension tends to reduce the “drift.”
Are adhesive picture hooks safe for rentals?
They can be, especially for lighter frames on smooth paint, but surface prep and cure time matter. Textured walls, dusty paint, or humidity can cause failures, so test cautiously with lighter items first.
How do I know if I need a stud for picture hanging?
If the frame is heavy, in a high-traffic spot, or placed where a fall would be risky, using a stud is typically the more stable choice. When studs aren’t available, choose anchors rated for your wall type and install carefully.
What tools make picture hanging easier even with a kit?
A small level, tape measure, pencil, and a stud finder cover most needs. For gallery walls, paper templates or painter’s tape layout lines can save a lot of rework.
Can I reuse holes when moving a picture?
Sometimes, but only if the hole and fastener still fit snugly. If the hole widened or the anchor spins, replacing the anchor and moving slightly is usually more reliable than forcing it.
If you’re trying to hang a mix of frames quickly and you want fewer surprises, look for a kit that includes multiple hook ratings, at least one anchor style, and simple layout tools, that combo tends to keep “easy” honest in real rooms.