
How to drill flat bottom holes with forstner bit comes down to three things most people overlook: a stable setup, the right speed, and controlled feed pressure so the rim cutter stays in charge.
If your holes keep coming out slightly dished, scorched, or ragged at the edges, it’s usually not because you bought the “wrong” bit, it’s because Forstners are picky about how they start and how they’re supported as they cut. A spade bit will forgive you, a Forstner won’t.
This guide walks through practical setups for drill press and hand drill, depth control that stays consistent across multiple holes, and small habit changes that typically clean up the bottom surface and reduce tear-out.
What a Forstner Bit Actually Does (and Why Flat Bottoms Fail)
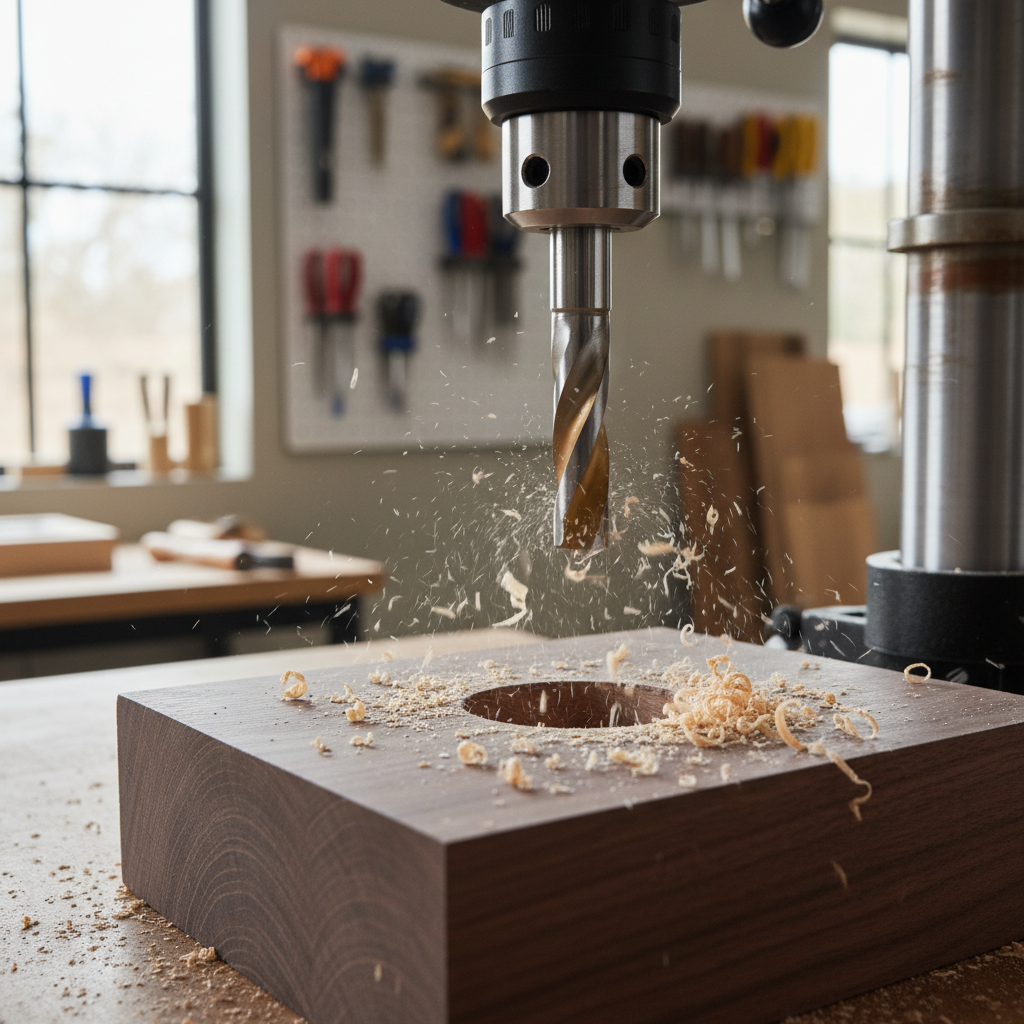
A Forstner bit cuts differently than twist bits. The outer rim scores the circle, then the inner cutters shave the waste. When everything is aligned, you get a crisp edge and a flat-ish bottom that looks intentional.
Flat bottoms usually go wrong for a few predictable reasons:
- Wobble at startup, the rim can’t score cleanly, so the bit skates and chews fibers.
- Too much speed, friction rises fast, leading to burning and a glazed bottom surface.
- Packing chips, waste can’t clear, the bit rides up on debris, and depth gets inconsistent.
- Flex in the workpiece, especially on thin stock, the bottom looks uneven because the wood moved.
One more reality check: most Forstner holes are “flat enough” for hardware and joinery, but if you need a perfectly machined floor, you may still plan for a light cleanup pass with a router plane or chisel.
Tools, Bit Choices, and a Simple Setup Table
You can drill clean flat-bottom holes with a bargain bit, but the margin for error shrinks. A sharp, well-made Forstner gives you cleaner scoring and less heat, which matters in maple, oak, plywood, and anything resinous.
Here’s a practical setup reference. Treat it as a starting point, then adjust if you see burning or chatter.
| Scenario | Recommended tool | What to prioritize | Typical mistake |
|---|---|---|---|
| Repeated holes, same depth | Drill press + depth stop | Clamping + chip clearing | Feeding too fast, packing chips |
| Large bit (1 1/2 in.+) | Drill press preferred | Lower RPM, steady feed | High speed causes burning |
| On-site / no drill press | Hand drill + guide jig | Keeping the bit square | Starting freehand, wobble |
| Plywood/veneered stock | Either + backer board | Edge scoring, tear-out control | Drilling straight through unsupported |
According to OSHA, securing workpieces and using appropriate personal protective equipment reduces the chance of common shop injuries, so clamp the work and treat eye protection as non-negotiable.
Quick Self-Check: Why Your Hole Isn’t Clean or Flat
If you only change one thing, change the diagnosis step. The symptoms usually point to one or two root causes.
- Burn marks on the rim or bottom: RPM too high, dull bit, or not clearing chips.
- Ragged edge / splintering: no backer board, starting too aggressively, or dull rim scorer.
- Bottom looks slightly domed or uneven: work moved, bit wandered at start, or chips packed under cutters.
- Hole oversize: wobble in chuck, flex from hand drilling, or cheap bit with inconsistent rim.
- Bit “grabs” and jerks: feeding too fast, especially in softwoods; also common with larger diameters.
When people search how to drill flat bottom holes with forstner bit, they often assume “flat bottom” is only about depth stop settings, but in many cases the edge score is the real problem, because once the rim loses its track, everything looks messy.

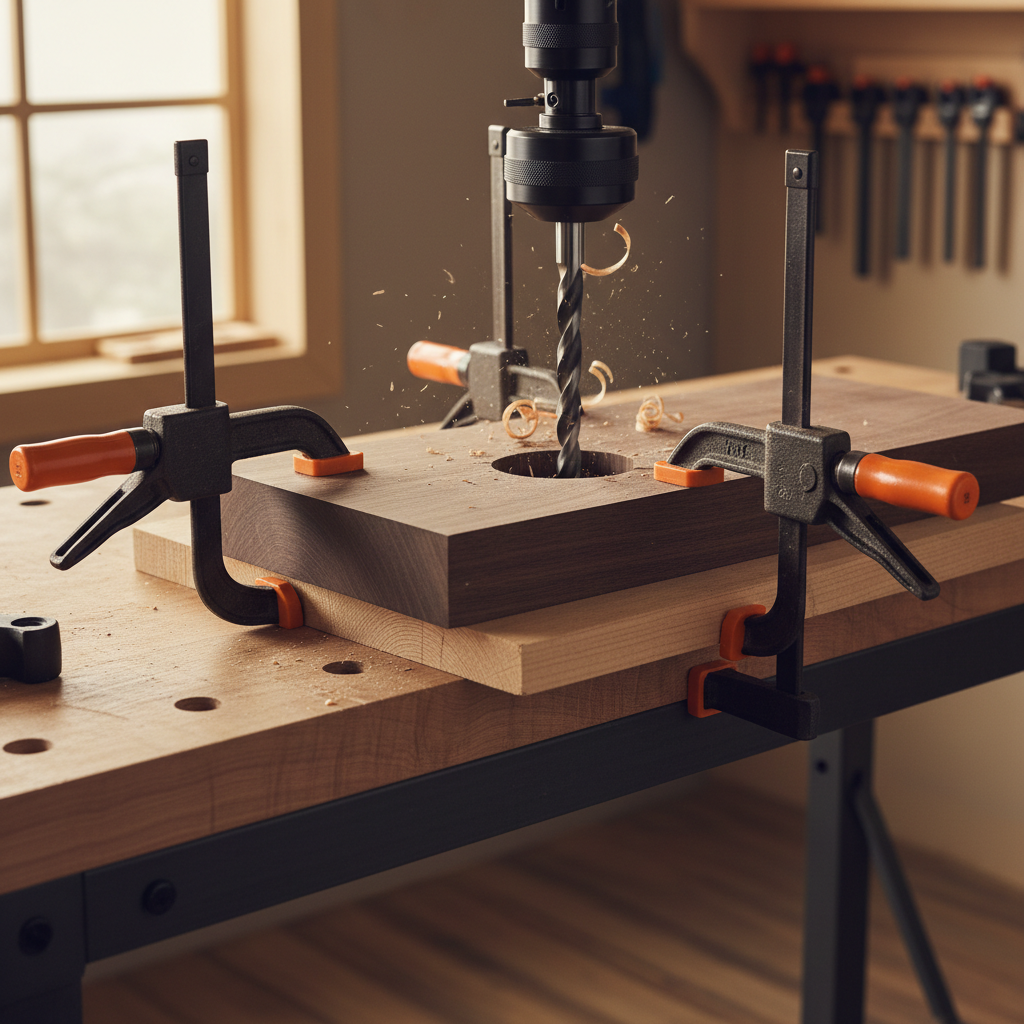
Step-by-Step: Drill Press Method (Most Consistent Results)
If you have a drill press, use it. A Forstner bit rewards rigid alignment, and the press does most of the hard work for you.
1) Mark, center, and support the work
- Use a sharp pencil or marking knife, then punch a tiny dimple at center if your bit has a point.
- Put a backer board under the work even if you’re not drilling through; it reduces blowout and supports thin stock.
- Clamp the workpiece so it can’t spin. Forstners can grab, and spinning stock is where projects and knuckles go to die.
2) Set speed with heat in mind
Lower RPM is usually safer as bit size increases. If you smell scorching or see dark rings, slow down, clear chips more often, or both. The “right” speed varies by wood species and bit quality, so let heat be your feedback.
3) Start the cut gently, then feed steadily
- Bring the bit down until the rim just kisses the surface.
- Let the rim score a full circle before you apply real pressure.
- Once scored, feed with consistent pressure, not a shove.
4) Peck to clear chips
Raise the bit every so often so chips can escape. Packed chips cause burning and can lift the bit slightly, which is a sneaky reason the bottom looks uneven across “same-depth” holes.
5) Use the depth stop, then confirm with a test hole
Depth stops are great, but tolerances stack up: wood thickness varies, benches flex, and backer boards compress. Drill a test hole in scrap from the same material, then lock in your stop.
Hand Drill Method: Clean Results Without a Drill Press
Hand drilling is where most frustration lives, because keeping the bit square is harder than people expect. The fix is not “stronger wrists,” it’s a guide.
Use a guide block or portable drill guide
- Guide block: drill a clean hole through a thick hardwood block on a drill press first, then use that block as a jig for the hand drill.
- Portable drill guide: a commercial guide keeps the drill perpendicular and helps repeat depth with stops.
Start with a scoring pass
For a cleaner rim, do a short scoring cut, back out, clear chips, then continue to depth. This small pause often eliminates the “chewed edge” look.
Control torque and grabbing
Larger Forstners can catch. Use two hands, brace your stance, and keep your speed moderate. If you feel repeated grabbing, reduce feed pressure and clear chips more frequently.
In jobsite situations, how to drill flat bottom holes with forstner bit often becomes a jig question, not a bit question. A simple guide block can change the whole outcome.
Tear-Out, Burning, and Chip Packing: Fixes That Actually Work
Most “fix lists” online tell you everything at once. In a real shop, you pick the one change that matches the symptom.
- Tear-out at entry: score gently first, reduce feed rate, verify the rim is sharp.
- Tear-out at exit: clamp a backer board tight, or stop just before breakthrough and finish from the other side using the center mark.
- Burning: slow RPM, sharpen/replace the bit, and peck more often. Resinous woods may need extra chip clearing.
- Rough bottom: clear chips, avoid rocking the drill, and check that the work is fully supported.
- Chatter marks: clamp better, reduce speed slightly, and make sure the bit shank is seated true in the chuck.
Real-World Use Cases: Hinges, Dowels, and Counterbores
“Flat bottom” means different things depending on why you’re drilling.
- Concealed hinges (e.g., 35 mm cups): depth consistency matters more than a polished bottom. Use stops and a test piece, then drill all doors in one session to keep setup consistent.
- Dowel sockets: keep the drill square; a slight angle makes alignment problems later, even if the bottom looks decent.
- Counterbores for bolts/washers: prioritize a crisp rim and correct diameter; a tiny texture on the bottom rarely affects function.
If you’re chasing perfectly uniform bottoms because hardware rocks or sits proud, check the hardware first. Some washers and hinge cups have their own tolerances, and you can waste time “perfecting” a hole that already meets the real requirement.
Key Takeaways and a Practical Final Checklist
The fastest path to better results is boring: clamp, slow down, score first, clear chips. That’s the difference between a clean, flat-looking recess and a scorched crater.
- Stability beats strength: secure the work and keep the drill square.
- Let the rim score: gentle start, then steady feed.
- Heat is a signal: burning usually means too fast, too dull, or too clogged.
- Backer boards pay off: less tear-out, cleaner edges, fewer do-overs.
If your next project needs repeatable joinery, pick one setup method and do a few test holes in scrap before touching the real part. That small warm-up is where clean work comes from.
If you want, share what tool you’re using (drill press or hand drill), bit size, and wood species, and you’ll get more targeted advice on how to drill flat bottom holes with forstner bit for that exact scenario.